@freeCodeCamp: Starting a presentation from a blank slide can make it hard to figure out the story you want to tell. In this tutorial,…
摘要
Tutorial on using Claude Code and Marp to brainstorm, draft, and iterate presentation decks in Markdown, then export to HTML or PowerPoint.
查看缓存全文
缓存时间: 2026/07/31 14:57
Starting a presentation from a blank slide can make it hard to figure out the story you want to tell.
In this tutorial, Omer shows you how to use Claude Code and Marp to brainstorm a deck, react to a first draft, and iterate on the slides in Markdown.
You’ll also learn how to preview the deck in VS Code and export it to HTML and PowerPoint when you’re ready to present.
https://freecodecamp.org/news/how-to-use-claude-code-and-marp-to-think-through-presentations/…
Stop Staring at a Blank Deck: How I Use Claude Code + Marp to Think Through Presentations
Source: https://www.freecodecamp.org/news/how-to-use-claude-code-and-marp-to-think-through-presentations/
 The hard part of building a presentation is figuring out thestory. What are you trying to say? What’s the structure? Which sections build on which? Where does the data go, table or bullets? Before the comparison or after?
Whatwouldhelp is having something toreact to. Starting from zero is hard. Reacting to a draft is fast. “Move this before that” is way easier than “what should I say?”
That’s the workflow I want to show you. I use Claude Code + Marp to think through presentations. Claude helps me brainstorm the story, gives me a first draft to react to, and then I iterate, either through “conversation” or by editing the Markdown directly. The whole thing is a text file. 🎉
(I used a deck to think through this post. You can find ithere.)
We’ll cover:
- The Workflow - Brainstorm - React - Iterate - Export - Editable PPTX
- Get Started in 5 Minutes - 1. Install Marp CLI - 2. Install the skill (via skills.sh) - Run it - Iterate
- Use Case: This Very Article
- Under the Hood - Marp: Markdown to Slides - The Skill File - Section Dividers - Breadcrumb Navigation
- Wrapping Up
The Workflow
The process has four stages:Brainstorm,React,Iterate,Export. Let me walk through each one.
Brainstorm
You kick things off with a slash command (I will provide you with this command later):
/create-marp-deck API rate limiting
Claude starts by interviewing you, asks about the goal, audience, key points, any data you want to include. This partforces you to articulate the story before a single slide exists.
 ```
~/projects/my-app $ claude
```
~/projects/my-app $ claude
/create-marp-deck API rate limiting ─────────────────────────────────────────────
Claude: What’s this presentation about? What should the audience walk away knowing?
User: How our rate limiting works, which algorithm we chose and why, and what they need to know to configure it for their services.
Claude: Who’s the audience?
User: Platform engineering team — they know our stack but haven’t seen the rate limiting internals.
Claude: What are the key points or sections you want to cover?
User: 1. Why we need rate limiting (the incident last month) 2. Token bucket vs sliding window — our decision 3. How to configure it per-service 4. Monitoring dashboard walkthrough
Think of it as a lightweight brainstorm: you talk through what you’re trying to say, and Claude helps you structure it\.
### React
Once you’ve aligned on the structure, Claude generates the full Marp Markdown file and exports it\. You get a solid first draft you can*react to*and reshape\.
That title slide came from this Markdown:
API Rate Limiting
A Technical Deep Dive
Team: Platform Engineering Date: February 2026
Is it perfect? Probably not\. But now you have something concrete, with sections, structure, and a story, that you can push around\. That’s so much faster than starting from a blank canvas\.

When you go through the slides, you*feel*if the story is coherent and clear\.

### Iterate

While reviewing the draft, it'll inevitably spark ideas: “oh, I should add a comparison table here,” “this section is too dense, maybe split it into two,” “move this summary up to the top\.”

One way to make such edits is to ask Claude Code to do that:
“Slide 6 is too dense. Split the algorithm comparison into two slides, one for token bucket, one for sliding window.”
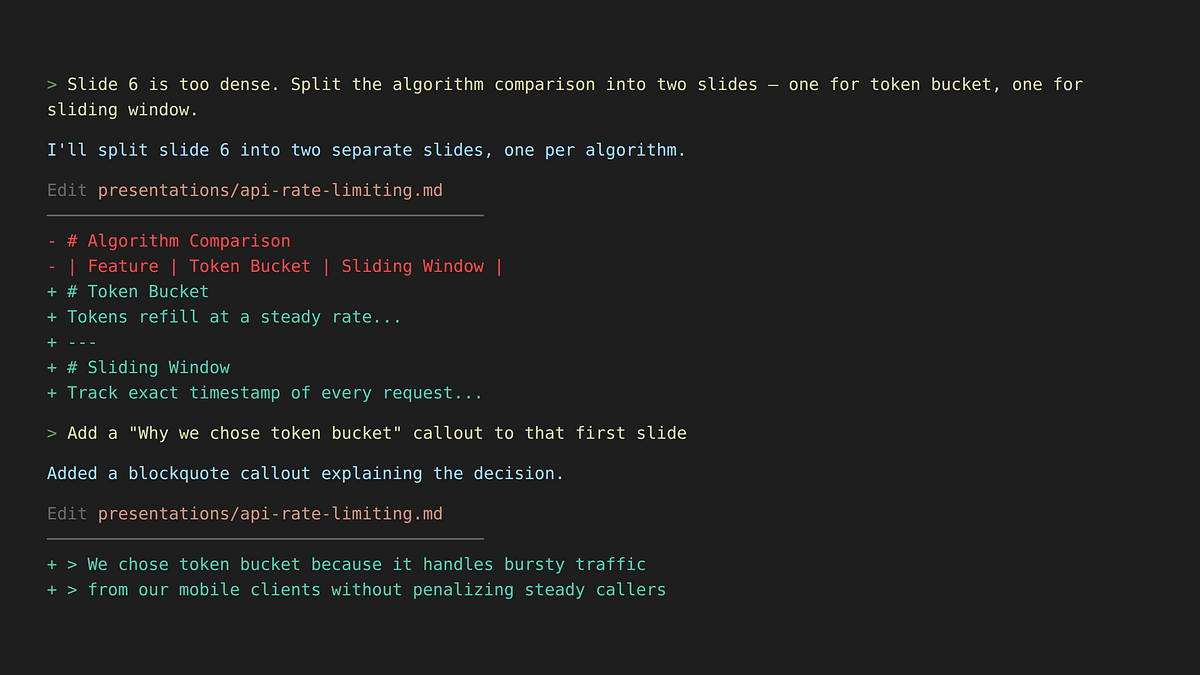```
> Slide 6 is too dense. Split the algorithm comparison into two
slides — one for token bucket, one for sliding window.
Claude: I'll split slide 6 into two separate slides, one per algorithm.
Edit presentations/api-rate-limiting.md
───────────────────────────────────────
- # Algorithm Comparison
- | Feature | Token Bucket | Sliding Window |
+ # Token Bucket
+ Tokens refill at a steady rate...
+ ---
+ # Sliding Window
+ Track exact timestamp of every request...
> Add a "Why we chose token bucket" callout to that first slide
Claude: Added a blockquote callout explaining the decision.
Edit presentations/api-rate-limiting.md
───────────────────────────────────────
+ > We chose token bucket because it handles bursty traffic
+ > from our mobile clients without penalizing steady callers
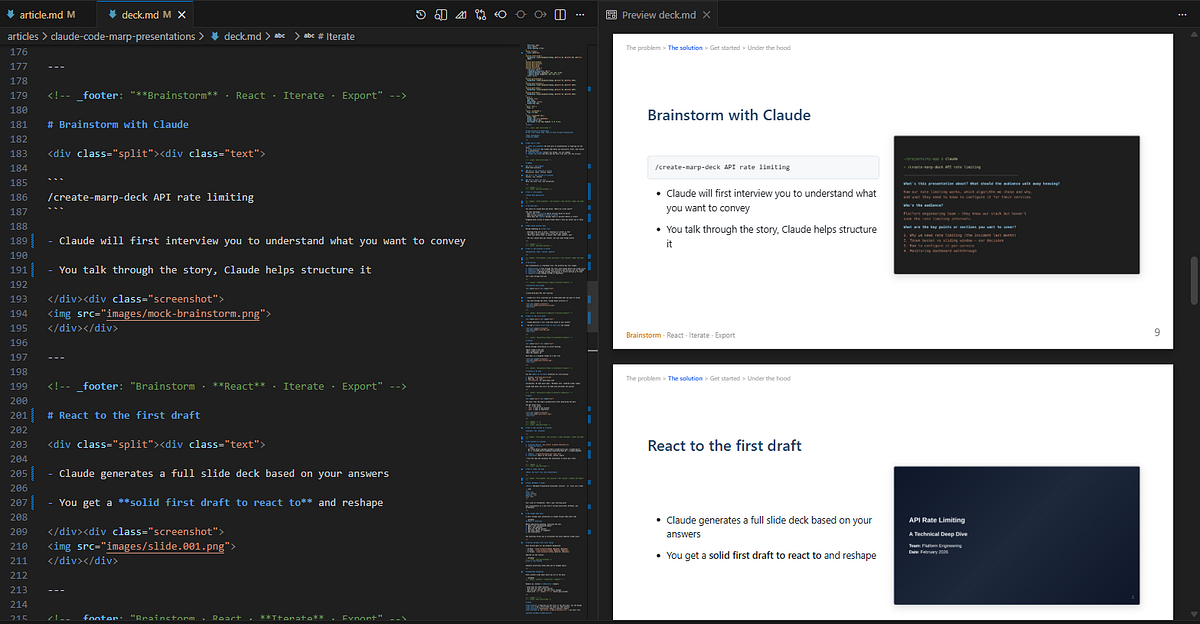
You can also edit inVS Codewith the Marp extension for live preview. Open the\.mdfile, hitCtrl\+Shift\+V, and you get the source on the left with rendered slides on the right. Claude Code edits the file, VS Code detects the change, and the preview updates automatically. (I keep both open side by side and it just works.)
 ### Export
When you’re done, you get three files:
\.md– the source (version-controlled, diffable)\.html– open in any browser, share via Slack\.pptx– open in PowerPoint, present anywhere
$ marp --no-stdin deck.md -o deck.html
[  INFO ] Converting 1 markdown...
[  INFO ] deck.md => deck.html

$ marp --no-stdin --pptx deck.md -o deck.pptx
[  INFO ] Converting 1 markdown...
[  INFO ] deck.md => deck.pptx

$ ls presentations/
api-rate-limiting.md
api-rate-limiting.html   ✓ open in browser, share via Slack
api-rate-limiting.pptx   ✓ open in PowerPoint, present anywhere
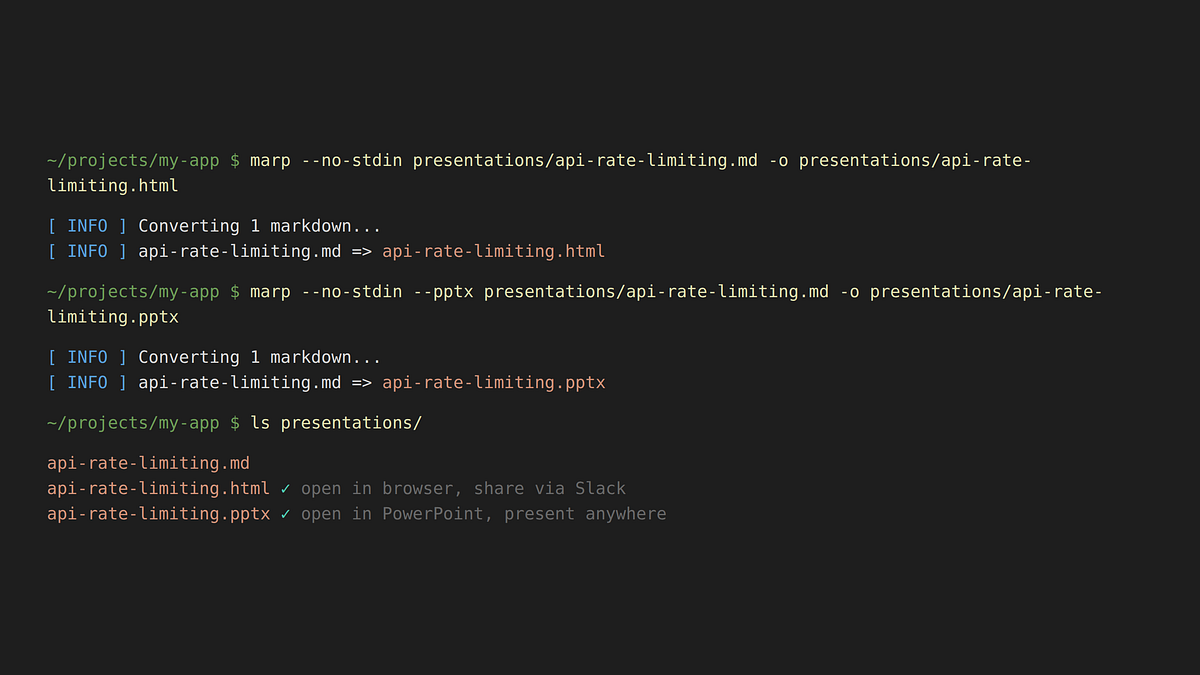 The skill runs the export commands automatically after generating the deck. A 15-slide deck converts in about 2 seconds.
Editable PPTX
The standard PPTX export renders each slide as an image – pixel-perfect, but you can’t edit the text in PowerPoint or Google Slides. If you need editable text, Marp has a\-\-pptx\-editableflag that uses LibreOffice under the hood to produce real text boxes.
The catch: LibreOffice creates text boxes that are too narrow, so text wraps and overlaps. The skill includes a python-pptx post-processing script that automatically widens the text boxes to fix this. Just ask for “editable PPTX” and the skill handles the rest – the LibreOffice conversion, the text box fix, everything.
Get Started in 5 Minutes
OK, are you ready? Here’s everything you need:
1. Install Marp CLI:
npm install \-g @marp\-team/marp\-cli
2. Install the skill (viaskills.sh):
npx skills add Omerr/claude\-skills
This works with Claude Code, Cursor, GitHub Copilot, and other AI agents. You can also install manually ( see therepofor details).
3. Run it:
/create\-marp\-deck your topic here
4. Iterate:
React to the draft, refine through conversation or VS Code, and export.
That’s it. Four steps. Fork the repo and customize the conventions to match your style.
Use Case: This Very Article
Want to see this workflow in practice? You’re looking at it.
I wrote this article by first creating a slide deck using exactly the process I described above. I ran/create\-marp\-deck, answered the interview questions, got a first draft, and iterated until the story felt right. You cansee the deck here.
Why start with slides? Because a deck forces you to be concise and to go through thestory. If the story doesn’t flow across 15 slides, it won’t flow across 1,500 words either. The deck became my outline, and once I had a coherent structure there, writing the article was much easier.
So if you’re ever staring at a blank doc thinking “I should write a blog post about X,” try making a deck first. You might be surprised how much faster the writing goes when the story is already figured out. 😎
Under the Hood
If you’re curious about what makes this work, read on. If not, you’re all set. 🙌🏻
Marp: Markdown to Slides
Marp(Markdown Presentation Ecosystem) converts\.mdfiles into slides. Your deck starts with frontmatter:
---
marp: true
theme: default
paginate: true
size: 16:9
---
Four lines and you have widescreen, paginated slides. Slide breaks are just\-\-\-in the Markdown. Your presentation is a text file: version-controlled, diffable, and AI-editable.
The Skill File
Youcouldjust ask Claude Code to “make me a Marp presentation” every time. But you’d spend half the conversation explaining your preferred format, color palette, and slide structure.
Instead, I created aClaude Code skill(see ithere), a reusable set of instructions that Claude follows whenever you invoke it. It has two parts:
- Aninterview phasethat gathers context before generating anything (the 5 questions from the brainstorm step)
- Ageneration phasewith the full Marp conventions: CSS palette, slide structure, breadcrumb pattern, formatting rules, and export commands
The full skill is about 200 lines. That sounds like a lot, but you write it once and then every deck you create follows the same polished conventions automatically.
Section Dividers
Each section of the deck gets its own gradient background. So when you’re presenting, the audience intuitively knows when you’ve moved to a new topic:
 Applied via CSS classes in the skill:
<!-- _class: lead part-problem -->
# Part 1: The Problem
Breadcrumb Navigation
This is my favorite part of the whole setup.
Every content slide has a breadcrumb header at the top that shows where you are in the deck:
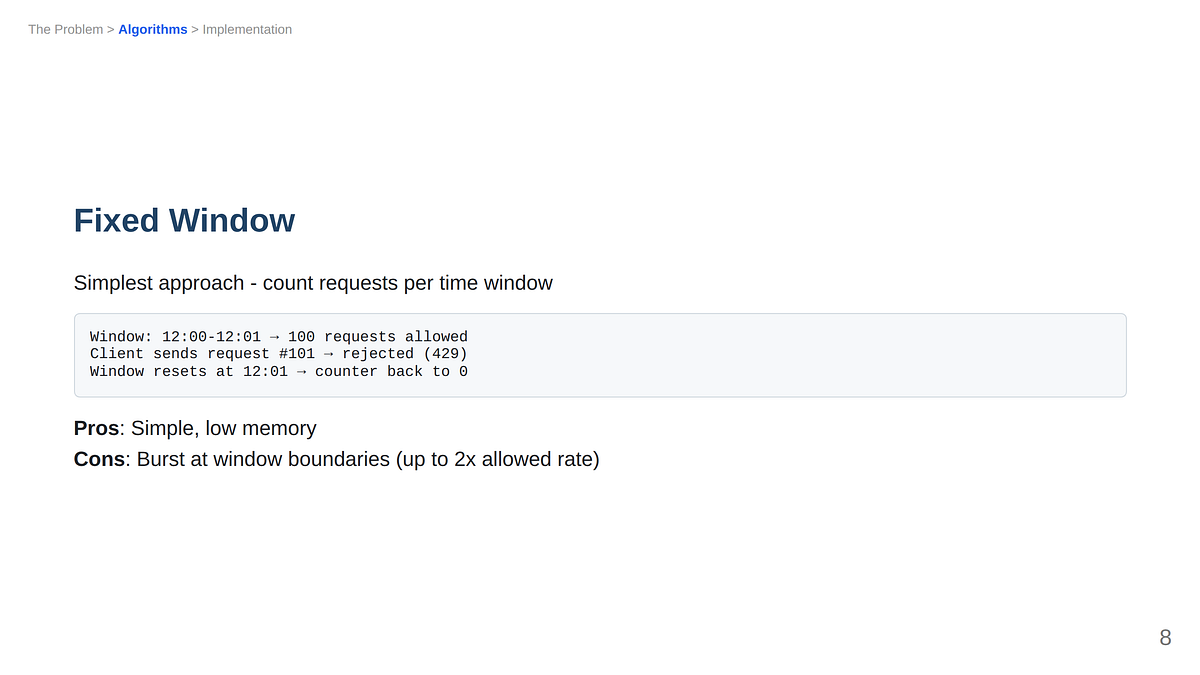 See that header? “The Problem >Algorithms> Implementation”, with “Algorithms” highlighted in blue.
In Marp, this is done with a simple HTML comment:
<!-- header: "The Problem > **Algorithms** > Implementation" -->
The\*\*bold\*\*text renders in blue (via CSSheader strong \{ color: \#2563eb; \}), while the rest stays gray. You set it once per section and it persists until you change it.
How often have you sat through a presentation wondering “wait, where are we?” 🤔
Wrapping Up
The hard part of presentations is telling a coherent story. Get yourself a first draft to react to, iterate until it flows, and export. That’s it.
If you want to try it:npm install \-g @marp\-team/marp\-cli, runnpx skills add Omerr/claude\-skills, and then/create\-marp\-deck. You’ll have a deck in minutes and a workflow you can reuse for every presentation after that.
About the Author
Omer Rosenbaumis the author of theBriefYouTube Channel. He’s also a cyber training expert and founder of Checkpoint Security Academy. He’s the author ofProduct-Led Research,Gitting Things Done(in English) andComputer Networks(in Hebrew). You can find him onTwitter.
Learn to code for free. freeCodeCamp’s open source curriculum has helped more than 40,000 people get jobs as developers.Get started
相似文章
每次需要制作演示文稿时,我都会从空白文档开始。Claude 可以通过对话构建整个演示文稿,而我最近才意识到这一点。
描述了一种使用 Claude AI 通过对话式访谈来构建演示文稿的工作流程,比手动起草更能产出结构清晰的幻灯片。
ArcDeck:叙事驱动的论文到幻灯片生成
ArcDeck 是一个多智能体框架,通过话语树和迭代智能体优化来建模逻辑流程,从而从学术论文生成演示幻灯片,性能优于直接摘要方法。该论文还引入了 ArcBench,这是一个新的基准测试,用于评估论文到幻灯片生成,强调叙事连贯性和逻辑结构。
@dashboardlim:我制作了一份完整指南,教你如何用 Claude Design 设计任何东西,还附带可直接复制的交互式提示词……
一份免费指南,提供可直接复制的提示词,教你用 Claude Design 创建网站、融资演示稿、应用原型等设计资产。
@Designarena: https://x.com/Designarena/status/2069512922230083691
DesignArena 开源了一个 Python 库,利用无头 Chromium 将 HTML/CSS 转换为可编辑的 PowerPoint 文件,并分享了从生成超过5万张AI幻灯片中积累的经验。
@GoSailGlobal: 2026 做 PPT 不再用 PowerPoint。 5 种 AI 驱动的 PPT 风格,覆盖: · founder pitch · McKinsey 咨询风 · 横屏 HTML deck · 图片美学 deck · 全栈营销 slide…
文章对比了 25 种开源 AI PPT 生成技能工具,推荐了 guizang-ppt-skill 等集成 MCP 和 Claude Code 的自动化方案,涵盖咨询风、HTML deck 等多种风格。