A guide to setting up Immich, a self-hosted photo management tool, to replace Google Photos, covering hardware, installation on NixOS, and secure access via Tailscale.
<p>For every cloud service I use, I want to have a local copy of my data for backup
purposes and independence. Unfortunately, the <code>gphotos-sync</code> tool <a href="https://github.com/gilesknap/gphotos-sync-discussion/discussions/1">stopped
working in March
2025</a> when
Google restricted the OAuth scopes, so I needed an alternative for my existing
Google Photos setup. In this post, I describe how I have set up
<a href="https://immich.app/">Immich</a>, a self-hostable photo manager.</p>
<p>Here is the end result: a few (live) photos from <a href="/posts/2025-09-21-nixcon-2025-trip-report/">NixCon
2025</a>:</p>
<a href="https://michael.stapelberg.ch/posts/2025-11-29-self-hosting-photos-with-immich/2025-11-19-immich-screenshot-featured.jpg"><img
srcset="https://michael.stapelberg.ch/posts/2025-11-29-self-hosting-photos-with-immich/2025-11-19-immich-screenshot-featured_hu_6928fc2a893484f1.jpg 2x,https://michael.stapelberg.ch/posts/2025-11-29-self-hosting-photos-with-immich/2025-11-19-immich-screenshot-featured_hu_7c70567581178dd5.jpg 3x"
src="https://michael.stapelberg.ch/posts/2025-11-29-self-hosting-photos-with-immich/2025-11-19-immich-screenshot-featured_hu_744c6f048556917c.jpg"
alt="screenshot of Immich in a web browser" title="screenshot of Immich in a web browser"
width="600"
height="504"
style="
border: 1px solid #000;
"
loading="lazy"></a>
<h2 id="step-1-hardware">Step 1. Hardware</h2>
<p>I am running Immich on my <a href="/posts/2024-07-02-ryzen-7-mini-pc-low-power-proxmox-hypervisor/">Ryzen 7 Mini PC (ASRock DeskMini
X600)</a>, which
consumes less than 10 W of power in idle and has plenty of resources for VMs (64
GB RAM, 1 TB disk). You can read more about it in my blog post from July 2024:</p>
<div class="postlink">
<div>
<a href="https://michael.stapelberg.ch/posts/2024-07-02-ryzen-7-mini-pc-low-power-proxmox-hypervisor/"><h3>Ryzen 7 Mini-PC makes a power-efficient VM host</h3></a>
</div>
<div class="summary">
<a href="https://michael.stapelberg.ch/posts/2024-07-02-ryzen-7-mini-pc-low-power-proxmox-hypervisor/" style="min-width: 200px; margin-right: 1.5rem; margin-bottom: 1.5rem"><img src="https://michael.stapelberg.ch/posts/2024-07-02-ryzen-7-mini-pc-low-power-proxmox-hypervisor/240630-server-featured_hu_6c2736729d115f81.jpg" width="200" height="134"/></a>
<p>
<a href="https://michael.stapelberg.ch/posts/2024-07-02-ryzen-7-mini-pc-low-power-proxmox-hypervisor/">
When I saw the first reviews of the ASRock DeskMini X600 barebone, I was immediately interested in building a home-lab hypervisor (VM host) with it. Apparently, the DeskMini X600 uses less than 10W of power but supports latest-generation AMD CPUs like the Ryzen 7 8700G!
<span class="readmore"><a href="https://michael.stapelberg.ch/posts/2024-07-02-ryzen-7-mini-pc-low-power-proxmox-hypervisor/">Read more →</a></span>
</a>
</p>
</div>
</div>
<p>I installed <a href="https://proxmox.com/en/">Proxmox</a>, an Open Source virtualization
platform, to divide this mini server into VMs, but you could of course also
install Immich directly on any server.</p>
<h2 id="step-2-install-immich">Step 2. Install Immich</h2>
<p>I created a VM (named “photos”) with 500 GB of disk space, 4 CPU cores and 4 GB of RAM.</p>
<p>For the initial import, you could assign more CPU and RAM, but for normal usage, that’s enough.</p>
<p>I <a href="/posts/2025-06-01-nixos-installation-declarative/">(declaratively) installed
NixOS</a> on that VM as described in this blog post:</p>
<div class="postlink">
<div>
<a href="https://michael.stapelberg.ch/posts/2025-06-01-nixos-installation-declarative/"><h3>How I like to install NixOS (declaratively)</h3></a>
</div>
<div class="summary">
<a href="https://michael.stapelberg.ch/posts/2025-06-01-nixos-installation-declarative/" style="min-width: 200px; margin-right: 1.5rem; margin-bottom: 1.5rem"><img src="https://michael.stapelberg.ch/posts/2025-06-01-nixos-installation-declarative/nix-snowflake-rainbow-featured_hu_2c3edabdd6900fed.png" width="200" height="200"/></a>
<p>
<a href="https://michael.stapelberg.ch/posts/2025-06-01-nixos-installation-declarative/">
For one of my network storage PC builds, I was looking for an alternative to Flatcar Container Linux and tried out NixOS again (after an almost 10 year break). There are many ways to install NixOS, and in this article I will outline how I like to install NixOS on physical hardware or virtual machines: over the network and fully declaratively.
<span class="readmore"><a href="https://michael.stapelberg.ch/posts/2025-06-01-nixos-installation-declarative/">Read more →</a></span>
</a>
</p>
</div>
</div>
<p>Afterwards, I enabled Immich, with this exact configuration:</p>
<div class="highlight"><pre tabindex="0" style="background-color:#f0f0f0;-moz-tab-size:4;-o-tab-size:4;tab-size:4;"><code class="language-nix" data-lang="nix"><span style="display:flex;"><span>services<span style="color:#666">.</span>immich <span style="color:#666">=</span> {
</span></span><span style="display:flex;"><span> enable <span style="color:#666">=</span> <span style="color:#60add5">true</span>;
</span></span><span style="display:flex;"><span>};
</span></span></code></pre></div><p>At this point, Immich is available on <code>localhost</code>, but not over the network,
because NixOS enables a firewall by default. I could enable the
<code>services.immich.openFirewall</code> option, but I actually want Immich to only be
available via my Tailscale VPN, for which I don’t need to open firewall access —
instead, I use <code>tailscale serve</code> to forward traffic to <code>localhost:2283</code>:</p>
<pre tabindex="0"><code>photos# tailscale serve --bg http://localhost:2283
</code></pre><p>Because I have <a href="https://tailscale.com/kb/1081/magicdns">Tailscale’s MagicDNS</a>
and <a href="https://tailscale.com/kb/1153/enabling-https">TLS certificate provisioning</a>
enabled, that means I can now open <a href="https://photos.example.ts.net">https://photos.example.ts.net</a> in my browser
on my PC, laptop or phone.</p>
<h2 id="step-2-initial-photos-import">Step 2. Initial photos import</h2>
<p>At first, I tried importing my photos using the official Immich CLI:</p>
<pre tabindex="0"><code>% nix run nixpkgs#immich-cli -- login https://photos.example.ts.net secret
% nix run nixpkgs#immich-cli -- upload --recursive /home/michael/lib/photo/gphotos-takeout
</code></pre><p>Unfortunately, the upload was not running reliably and had to be restarted
manually a few times after running into a timeout. Later I realized that this
was because the Immich server runs background jobs like thumbnail creation,
metadata extraction or face detection, and these background jobs slow down the
upload to the extent that the upload can fail with a timeout.</p>
<p>The other issue was that even after the upload was done, I realized that Google
Takeout archives for Google Photos contain metadata in separate JSON files next
to the original image files:</p>
<a href="https://michael.stapelberg.ch/posts/2025-11-29-self-hosting-photos-with-immich/2025-11-19-google-photos-takeout.jpg"><img
srcset="https://michael.stapelberg.ch/posts/2025-11-29-self-hosting-photos-with-immich/2025-11-19-google-photos-takeout_hu_c2ca8fd1cf90122a.jpg 2x,https://michael.stapelberg.ch/posts/2025-11-29-self-hosting-photos-with-immich/2025-11-19-google-photos-takeout_hu_7169d5fe6b33d18d.jpg 3x"
src="https://michael.stapelberg.ch/posts/2025-11-29-self-hosting-photos-with-immich/2025-11-19-google-photos-takeout_hu_8ac7b224e95d405d.jpg"
alt="Takeout: Google Photos formats" title="Takeout: Google Photos formats"
width="600"
height="720"
style="
border: 1px solid #000;
"
loading="lazy"></a>
<p>Unfortunately, these files are not considered by <code>immich-cli</code>.</p>
<p>Luckily, there is a great third-party tool called
<a href="https://github.com/simulot/immich-go">immich-go</a>, which solves both of these
issues! It pauses background tasks before uploading and restarts them
afterwards, which works much better, and it does its best to understand Google
Takeout archives.</p>
<p>I ran <code>immich-go</code> as follows and it worked beautifully:</p>
<pre tabindex="0"><code>% immich-go \
upload \
from-google-photos \
--server=https://photos.example.ts.net \
--api-key=secret \
~/Downloads/takeout-*.zip
</code></pre><h2 id="step-3-install-the-immich-iphone-app">Step 3. Install the Immich iPhone App</h2>
<p>My main source of new photos is my phone, so I installed the Immich app on my
iPhone, logged into my Immich server via its Tailscale URL and enabled automatic
backup of new photos via the icon at the top right.</p>
<p>I am not 100% sure whether these settings are correct, but it seems like camera
photos generally go into Live Photos, and Recent should cover other files…?!</p>
<p>If anyone knows, please send an explanation (or a link!) and I will update the article.</p>
<a href="https://michael.stapelberg.ch/posts/2025-11-29-self-hosting-photos-with-immich/IMG_5893.PNG"><img
srcset="https://michael.stapelberg.ch/posts/2025-11-29-self-hosting-photos-with-immich/IMG_5893_hu_a062fb5b5187dc76.PNG 2x,https://michael.stapelberg.ch/posts/2025-11-29-self-hosting-photos-with-immich/IMG_5893_hu_9575452ad065a609.PNG 3x"
src="https://michael.stapelberg.ch/posts/2025-11-29-self-hosting-photos-with-immich/IMG_5893_hu_8ba00d1bf6088e0a.PNG"
width="600"
height="1304"
style="
border: 1px solid #000;
"
loading="lazy"></a>
<p>I also strongly recommend to disable notifications for Immich, because otherwise
you get notifications whenever it uploads images in the background. These
notifications are not required for background upload to work, as <a href="https://www.reddit.com/r/immich/comments/1nnk8i9/comment/nfoffbb/">an Immich
developer confirmed on
Reddit</a>. Open
<em>Settings</em> → <em>Apps</em> → <em>Immich</em> → <em>Notifications</em> and un-tick the permission checkbox:</p>
<a href="https://michael.stapelberg.ch/posts/2025-11-29-self-hosting-photos-with-immich/IMG_5894.PNG"><img
srcset="https://michael.stapelberg.ch/posts/2025-11-29-self-hosting-photos-with-immich/IMG_5894_hu_eae3457253ed621d.PNG 2x,https://michael.stapelberg.ch/posts/2025-11-29-self-hosting-photos-with-immich/IMG_5894_hu_b720b6d63d234471.PNG 3x"
src="https://michael.stapelberg.ch/posts/2025-11-29-self-hosting-photos-with-immich/IMG_5894_hu_3ee31e31d3c5d235.PNG"
width="600"
height="667"
style="
border: 1px solid #000;
"
loading="lazy"></a>
<h2 id="step-4-backup">Step 4. Backup</h2>
<p><a href="https://docs.immich.app/administration/backup-and-restore">Immich’s documentation on
backups</a> contains
some good recommendations. The Immich developers recommend backing up the entire
contents of <code>UPLOAD_LOCATION</code>, which is <code>/var/lib/immich</code> on NixOS. The
<code>backups</code> subdirectory contains SQL dumps, whereas the 3 directories <code>upload</code>,
<code>library</code> and <code>profile</code> contain all user-uploaded data.</p>
<p>Hence, I have set up a systemd timer that runs <code>rsync</code> to copy <code>/var/lib/immich</code>
onto my PC, which is enrolled in a <a href="https://www.backblaze.com/blog/the-3-2-1-backup-strategy/">3-2-1 backup
scheme</a>.</p>
<h2 id="whats-missing">What’s missing?</h2>
<p>Immich (currently?) does not contain photo editing features, so to rotate or
crop an image, I download the image and use <a href="https://www.gimp.org/">GIMP</a>.</p>
<p>To share images, I still upload them to Google Photos (depending on who I share
them with).</p>
<h2 id="why-immich-instead-of">Why Immich instead of…?</h2>
<p>The two most promising options in the space of self-hosted image management
tools seem to be <a href="https://immich.app/">Immich</a> and <a href="http://ente.io/">Ente</a>.</p>
<p>I got the impression that Immich is more popular in my bubble, and Ente made the
impression on me that its scope is far larger than what I am looking for:</p>
<blockquote>
<p>Ente is a service that provides a fully open source, end-to-end encrypted
platform for you to store your data in the cloud without needing to trust the
service provider. On top of this platform, we have built two apps so far: Ente
Photos (an alternative to Apple and Google Photos) and Ente Auth (a 2FA
alternative to the deprecated Authy).</p>
</blockquote>
<p>I don’t need an end-to-end encrypted platform. I already have encryption on the
transit layer (Tailscale) and disk layer (LUKS), no need for more complexity.</p>
<h2 id="conclusion">Conclusion</h2>
<p>Immich is a delightful app! It’s very fast and generally seems to work well.</p>
<p>The initial import is smooth, but only if you use the right tool. Ideally, the
official <code>immich-cli</code> could be improved. Or maybe <code>immich-go</code> could be made the
official one.</p>
<p>I think the auto backup is too hard to configure on an iPhone, so that could
also be improved.</p>
<p>But aside from these initial stumbling blocks, I have no complaints.</p>
# Self-hosting my photos with Immich
Source: [https://michael.stapelberg.ch/posts/2025-11-29-self-hosting-photos-with-immich/](https://michael.stapelberg.ch/posts/2025-11-29-self-hosting-photos-with-immich/)
Table of contents- [Step 1\. Hardware](https://michael.stapelberg.ch/posts/2025-11-29-self-hosting-photos-with-immich/#step-1-hardware)
- [Step 2\. Install Immich](https://michael.stapelberg.ch/posts/2025-11-29-self-hosting-photos-with-immich/#step-2-install-immich)
- [Step 2\. Initial photos import](https://michael.stapelberg.ch/posts/2025-11-29-self-hosting-photos-with-immich/#step-2-initial-photos-import)
- [Step 3\. Install the Immich iPhone App](https://michael.stapelberg.ch/posts/2025-11-29-self-hosting-photos-with-immich/#step-3-install-the-immich-iphone-app)
- [Step 4\. Backup](https://michael.stapelberg.ch/posts/2025-11-29-self-hosting-photos-with-immich/#step-4-backup)
- [What’s missing?](https://michael.stapelberg.ch/posts/2025-11-29-self-hosting-photos-with-immich/#whats-missing)
- [Why Immich instead of…?](https://michael.stapelberg.ch/posts/2025-11-29-self-hosting-photos-with-immich/#why-immich-instead-of)
- [Conclusion](https://michael.stapelberg.ch/posts/2025-11-29-self-hosting-photos-with-immich/#conclusion)
For every cloud service I use, I want to have a local copy of my data for backup purposes and independence\. Unfortunately, the`gphotos\-sync`tool[stopped working in March 2025](https://github.com/gilesknap/gphotos-sync-discussion/discussions/1)when Google restricted the OAuth scopes, so I needed an alternative for my existing Google Photos setup\. In this post, I describe how I have set up[Immich](https://immich.app/), a self\-hostable photo manager\.
Here is the end result: a few \(live\) photos from[NixCon 2025](https://michael.stapelberg.ch/posts/2025-09-21-nixcon-2025-trip-report/):
[](https://michael.stapelberg.ch/posts/2025-11-29-self-hosting-photos-with-immich/2025-11-19-immich-screenshot-featured.jpg)
## Step 1\. Hardware
I am running Immich on my[Ryzen 7 Mini PC \(ASRock DeskMini X600\)](https://michael.stapelberg.ch/posts/2024-07-02-ryzen-7-mini-pc-low-power-proxmox-hypervisor/), which consumes less than 10 W of power in idle and has plenty of resources for VMs \(64 GB RAM, 1 TB disk\)\. You can read more about it in my blog post from July 2024:
I installed[Proxmox](https://proxmox.com/en/), an Open Source virtualization platform, to divide this mini server into VMs, but you could of course also install Immich directly on any server\.
## Step 2\. Install Immich
I created a VM \(named “photos”\) with 500 GB of disk space, 4 CPU cores and 4 GB of RAM\.
For the initial import, you could assign more CPU and RAM, but for normal usage, that’s enough\.
I[\(declaratively\) installed NixOS](https://michael.stapelberg.ch/posts/2025-06-01-nixos-installation-declarative/)on that VM as described in this blog post:
Afterwards, I enabled Immich, with this exact configuration:
```
services.immich = {
enable = true;
};
```
At this point, Immich is available on`localhost`, but not over the network, because NixOS enables a firewall by default\. I could enable the`services\.immich\.openFirewall`option, but I actually want Immich to only be available via my Tailscale VPN, for which I don’t need to open firewall access — instead, I use`tailscale serve`to forward traffic to`localhost:2283`:
```
photos# tailscale serve --bg http://localhost:2283
```
Because I have[Tailscale’s MagicDNS](https://tailscale.com/kb/1081/magicdns)and[TLS certificate provisioning](https://tailscale.com/kb/1153/enabling-https)enabled, that means I can now open[https://photos\.example\.ts\.net](https://photos.example.ts.net/)in my browser on my PC, laptop or phone\.
## Step 2\. Initial photos import
At first, I tried importing my photos using the official Immich CLI:
```
% nix run nixpkgs#immich-cli -- login https://photos.example.ts.net secret
% nix run nixpkgs#immich-cli -- upload --recursive /home/michael/lib/photo/gphotos-takeout
```
Unfortunately, the upload was not running reliably and had to be restarted manually a few times after running into a timeout\. Later I realized that this was because the Immich server runs background jobs like thumbnail creation, metadata extraction or face detection, and these background jobs slow down the upload to the extent that the upload can fail with a timeout\.
The other issue was that even after the upload was done, I realized that Google Takeout archives for Google Photos contain metadata in separate JSON files next to the original image files:
[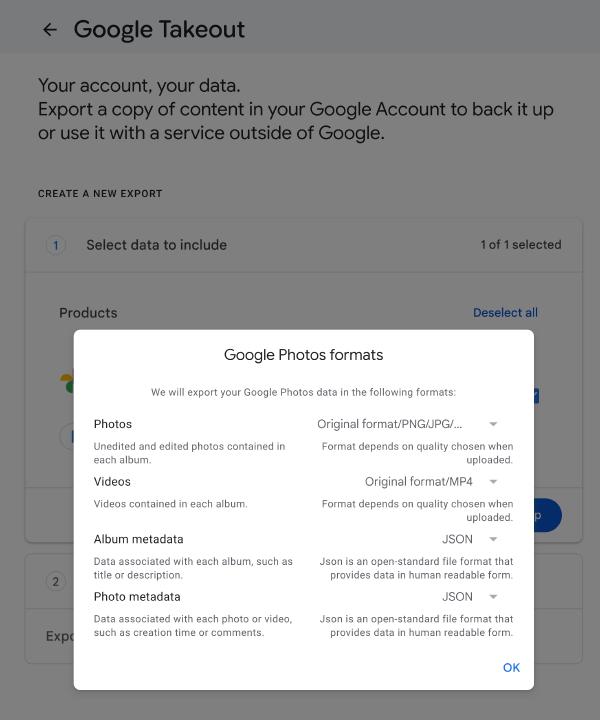](https://michael.stapelberg.ch/posts/2025-11-29-self-hosting-photos-with-immich/2025-11-19-google-photos-takeout.jpg)
Unfortunately, these files are not considered by`immich\-cli`\.
Luckily, there is a great third\-party tool called[immich\-go](https://github.com/simulot/immich-go), which solves both of these issues\! It pauses background tasks before uploading and restarts them afterwards, which works much better, and it does its best to understand Google Takeout archives\.
I ran`immich\-go`as follows and it worked beautifully:
```
% immich-go \
upload \
from-google-photos \
--server=https://photos.example.ts.net \
--api-key=secret \
~/Downloads/takeout-*.zip
```
## Step 3\. Install the Immich iPhone App
My main source of new photos is my phone, so I installed the Immich app on my iPhone, logged into my Immich server via its Tailscale URL and enabled automatic backup of new photos via the icon at the top right\.
I am not 100% sure whether these settings are correct, but it seems like camera photos generally go into Live Photos, and Recent should cover other files…?\!
If anyone knows, please send an explanation \(or a link\!\) and I will update the article\.
[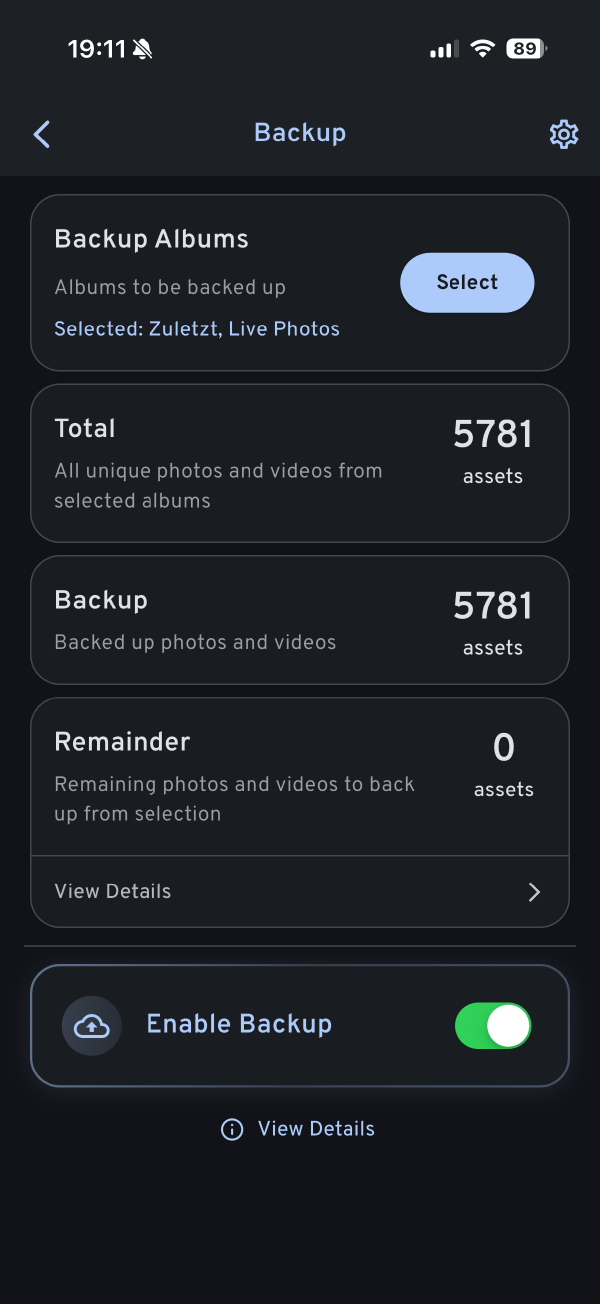](https://michael.stapelberg.ch/posts/2025-11-29-self-hosting-photos-with-immich/IMG_5893.PNG)
I also strongly recommend to disable notifications for Immich, because otherwise you get notifications whenever it uploads images in the background\. These notifications are not required for background upload to work, as[an Immich developer confirmed on Reddit](https://www.reddit.com/r/immich/comments/1nnk8i9/comment/nfoffbb/)\. Open*Settings*→*Apps*→*Immich*→*Notifications*and un\-tick the permission checkbox:
[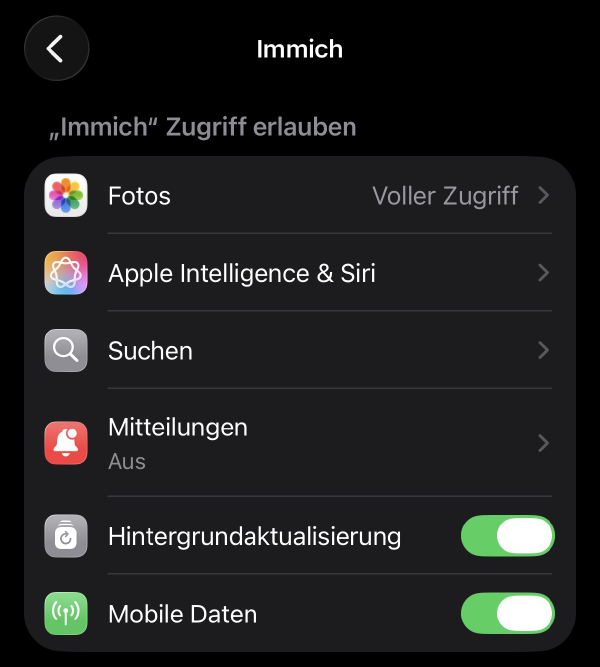](https://michael.stapelberg.ch/posts/2025-11-29-self-hosting-photos-with-immich/IMG_5894.PNG)
## Step 4\. Backup
[Immich’s documentation on backups](https://docs.immich.app/administration/backup-and-restore)contains some good recommendations\. The Immich developers recommend backing up the entire contents of`UPLOAD\_LOCATION`, which is`/var/lib/immich`on NixOS\. The`backups`subdirectory contains SQL dumps, whereas the 3 directories`upload`,`library`and`profile`contain all user\-uploaded data\.
Hence, I have set up a systemd timer that runs`rsync`to copy`/var/lib/immich`onto my PC, which is enrolled in a[3\-2\-1 backup scheme](https://www.backblaze.com/blog/the-3-2-1-backup-strategy/)\.
## What’s missing?
Immich \(currently?\) does not contain photo editing features, so to rotate or crop an image, I download the image and use[GIMP](https://www.gimp.org/)\.
To share images, I still upload them to Google Photos \(depending on who I share them with\)\.
## Why Immich instead of…?
The two most promising options in the space of self\-hosted image management tools seem to be[Immich](https://immich.app/)and[Ente](http://ente.io/)\.
I got the impression that Immich is more popular in my bubble, and Ente made the impression on me that its scope is far larger than what I am looking for:
> Ente is a service that provides a fully open source, end\-to\-end encrypted platform for you to store your data in the cloud without needing to trust the service provider\. On top of this platform, we have built two apps so far: Ente Photos \(an alternative to Apple and Google Photos\) and Ente Auth \(a 2FA alternative to the deprecated Authy\)\.
I don’t need an end\-to\-end encrypted platform\. I already have encryption on the transit layer \(Tailscale\) and disk layer \(LUKS\), no need for more complexity\.
## Conclusion
Immich is a delightful app\! It’s very fast and generally seems to work well\.
The initial import is smooth, but only if you use the right tool\. Ideally, the official`immich\-cli`could be improved\. Or maybe`immich\-go`could be made the official one\.
I think the auto backup is too hard to configure on an iPhone, so that could also be improved\.
But aside from these initial stumbling blocks, I have no complaints\.
Did you like this post?[Subscribe to this blog’s RSS feed](https://michael.stapelberg.ch/feed.xml)to not miss any new posts\!
I run a blog since 2005, spreading knowledge and experience for over 20 years\! :\)
Michael Stapelberg details his migration of a NAS from CoreOS/Flatcar Linux to NixOS, covering the step-by-step transition from Docker containers to native NixOS modules with practical examples.
A guide on declaratively installing NixOS over the network using tools like nixos-anywhere, with an emphasis on managing configuration files under version control.
A technical tutorial explaining how to self-host a website on a Raspberry Pi, covering port forwarding, DNS configuration, using Caddy as a reverse proxy, PM2 for Node.js process management, and GitHub Actions for CI/CD automation.
A tutorial demonstrating four ways to set up development shells using Nix, including interactive one-offs, config files, and hermetic Nix Flakes, using GoCV and OpenCV as an example.
OvertChat is a simpler, polished self-hosted alternative to Open WebUI for local AI models, featuring single Docker compose setup, built-in web search, and Kokoro TTS, all MIT licensed.