Cached at:
09/27/26, 01:31 AM
# mantle.nes breakdown blog part 1
Source: [https://melon.zone/blog/blog/gamedev/tech/fun/2026-09-23-mantle-nes-breakdown-part-1/](https://melon.zone/blog/blog/gamedev/tech/fun/2026-09-23-mantle-nes-breakdown-part-1/)
23 Sep 2026inBlog/[gamedev](https://melon.zone/blog/gamedev/)/Tech/[fun](https://melon.zone/blog/fun/)
the how and why of my multi\-month demake fangame project\!
 Back in 2025, I spent 3 months making[a demake\-slash\-fangame of a particular part of Deltarune Chapter 3](https://drmelon.itch.io/mantle)for the NES\! After I finished it, I thought it would be nice to make a video about how I built it\. However, after recording my takes, it was about 45 minutes of audio, and so much of it needed motion graphics and explainer visuals that editing it became a marathon project that my amateur video editing skills simply couldn’t follow through with\. So here we are \- a year after I released the project, I’m finally lifting the veil on some of the things I did to build it\! This post in particular will cover the reason why I went with a NES game, the initial hurdles I had to overcome, and dig into some of the technical nuts and bolts around backgrounds, level data, and my workflow\. It’s a little dense in places, but I’ll do my best to introduce various NES development concepts to anyone unfamiliar with them\! If that sounds like a good time, then read on\.\.\!
## Why NES?

It’s pretty transparent to anyone playing Deltarune Chapter 3 that the game\-within\-a\-game boards in the Dreemurr household dark world bear more than a passing resemblance to the original Legend of Zelda for NES\. While the boards themselves have a decent scoop of inspiration from Link’s Awakening for Game Boy in terms of locale and gameplay, the sprite resolution, overall colour palettes, music, and the little consoles and controllers themselves as presented in the world cement the game as more firmly living on a NES\-like fantasy console\. I had previous experience working on NES games already \- at least, I had tinkered a little bit and had enjoyed enormously[Pikuma’s course](https://pikuma.com/courses/nes-game-programming-tutorial)on beginning\-to\-end gamedev with 6502 assembly on the NES a few years back, so I felt confident I could pull it off\! Even if the journey seemed daunting, I just had to go one step at a time… 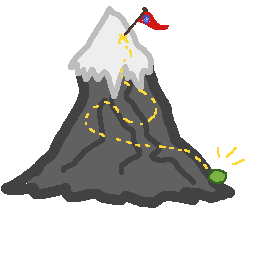
My initial plan was to make as direct a port of the hidden S\-Rank game boards as I could to the NES, with as much detail as I could muster\. This meant including sounds and music\. Given the scope and size of the games, I didn’t think that writing everything from scratch in assembly would result in me finishing anything that year, let alone within a few months\. As such, I decided to try my hand at writing C on the platform\. While it’s certainly not the most optimal in terms of code size \(as I would later contend with\), it certainly saves me a few headaches having more abstractions when I’m trying to spin up a game from nothing\.  To get started, I leaned on the NES development community and used a terminal tool called[`create\-nes\-game`](https://create-nes-game.nes.science/#/)to spin up a template CMake project with a bunch of sensible defaults for my ROM\. The tool also ships along some handy headers \(like Shiru’s`neslib\.h`\) and audio drivers \(although I did later modify the audio driver; more on that in another post\!\)\. I opted to use the MMC1 mapper chip for a couple of reasons; first, I knew from the start that my game would almost certainly not fit on a standard\-issue 32k[NROM chip](https://www.nesdev.org/wiki/NROM)\. Given I was opting to use C, I knew the code size would be pretty chunky, especially given the variety of enemies and behaviours present, and was also concerned when I ran the numbers on how many rooms were in the game; I definitely needed a mapper\. For the uninitiated, the first cartridge ROMs made for the NES had two sizes of program\-code \(“PRG”\) ROM available; 16kb, or 32kb\. Both variants had only 8kb of graphics \(“CHR”\) ROM\. These two variants are known as “NROM” chips\. However, due to the hardware\-based nature of cartridge games, both Nintendo and third\-party developers would later develop cartridges that had extra “banks” of both PRG and CHR ROM\. This worked by having a chip sit inbetween the NES and the ROM banks and occupy a portion of the mapped memory\. By writing to specific memory addresses linked to the chip, it could toggle on and off the connections between the ROM chips and the NES’ memory bus\. Because they actively altered which memory was mapped by the CPU’s address space, these chips were called “mapper chips”\. This process was invisible to the NES itself; it just carried on as though it were always attached to an NROM\. 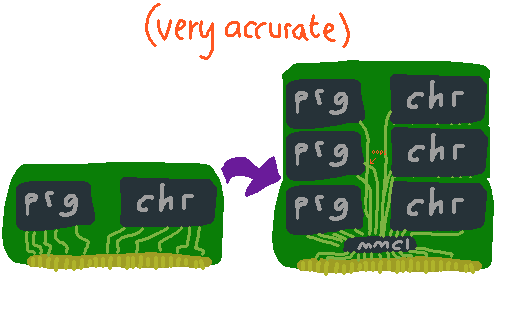 There were tons of mappers, with all kinds of different functionality\. Some mapper chips even extended the console’s capabilities in other ways\. Konami famously had several mapper chips that could drive[additional audio hardware](https://www.youtube.com/watch?v=J1BxV1yCqAg)for Famicom versions of their games \(although this behaviour does not function on unmodified USA & Europe NES consoles\)\. The MMC1 supports a number of configurations, up to a maximum of 256k of PRG ROM and 128k of CHR ROM\! In the end, I settled for 8 PRG ROM banks \(16k each\), and 4 CHR ROM banks \(8k each\), just to give myself plenty of wiggle room\. In the setup I chose, the first 16k ROM bank is fixed and always present \- so I could put things like my bank\-loading code in there\. Because otherwise, if I unloaded that bank and loaded another, and didn’t duplicate the bank loading code across, I wouldn’t be able to switch back easily…
And what was my second reason for using the MMC1 mapper chip, rather than something more convenient or fully\-featured like the MMC3? Well, it’s what the original Legend of Zelda used\! The game had been originally developed for the Famicom Disk System, and couldn’t fit on an NROM for export to the international markets \- so Nintendo used their new MMC1 chip for it\. And so, what better way to honor the callbacks already being made by Deltarune itself, than for my fangame to also make a nod towards Zelda in this way?
## Resolution, Display, Colours, and Tiles
With my setup figured out, it was time to actually start working on the game, and how I was going to adapt it\. As with any port, the first thing to establish is what differences exist in the target hardware\. The first and most important thing for me to contend with was the display; input was simple enough \- four directions and a button, easy\. Audio would wait until later\. In Deltarune’s fantasy console, the game’s world is divided up into rooms\. Each room takes up most of the screen’s display, and the characters can travel between the rooms at the edges, causing the screen to scroll over to reveal the next room\. Most game consoles from the era that Deltarune’s fantasy console mimics drew their backgrounds using tiles, and the Deltarune fantasy console is no different\. 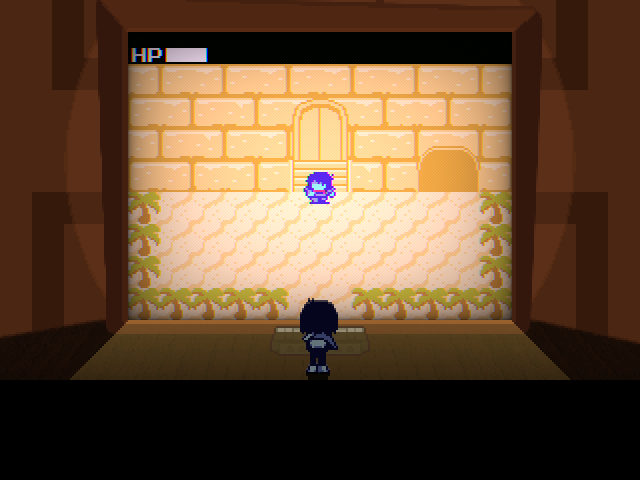 Each room appears to consist of a 12\-by\-8 grid of tiles, with each tile being 16 pixels wide, and 16 pixels tall\. However, the game’s HUD is displayed on a 16\-pixel\-tall strip along the top of the screen, but has a font and elements that fit within 8\-by\-8 tiles\. Note: the*actual*display resolution is larger, so that they can do some CRT\-style chromatic aberration detailing, but you can fairly reasonably count the pixels in the display\. So, it’s probably more accurate to assume that the Deltarune fantasy console display uses 8x8 tiles in the main play area, making it 24 tiles wide and 16 tiles tall\. Combined with the HUD area, the total console resolution is 24 tiles by 18 tiles, or 192x144 \- a 4:3 aspect ratio\. This is the same aspect ratio as Deltarune itself, and was the most common aspect ratio for TVs in the 80s and 90s\. It is the same vertical resolution as the original Game Boy and Game Boy Color, but they were narrower, only 160 pixels wide\. So, the rooms of the game wouldn’t fit on those handhelds on a single screen\. Luckily for me, the NES also uses 8x8 tiles to render backgrounds\. However, its output resolution is actually quite a bit bigger \- it supports a maximum resolution of 256x240 pixels, or 32x30 tiles, at a slightly awkward aspect ratio of 8:7\. On top of this, when outputting a 60Hz NTSC video signal \(rather than a 50Hz PAL signal\), the top and bottom 8 pixels are cut off, resulting in a resolution of 256x224 pixels, or 32x28 visible tiles\. I decided to make the game using the NTSC format, for no other reason than that I prefer to deal with 60Hz than 50Hz\.
So\! This leaves me with a whole bunch of empty space when I put a room on the screen\. I didn’t want to do something like expand the rooms out to the full screen size, as I would have either had to redesign most of the rooms and encounters or have significant segments of other rooms visible, which looked weird\. So, I made the decision to display the world in the middle of the screen, and put a border around the edges\. 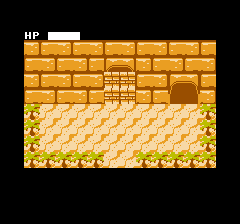 But wait\! I’m jumping the gun\!\! I can’t talk about entire rooms before I talk about the tiles themselves, and**colours**\! I can’t display the desert tiles in their original form on the NES\. Why? Well, the graphics chip on the NES, called the PPU, only supports 64 colours\. And of those 64, only 16 can be used at one time for the backgrounds of the game\. And, for each group of 2x2 tiles, only one subset of four colours from those 16 can be used\. And to top it all off, the first entry of each of those 4\-colour palettes is the background colour, and must be shared between all of those 4\-colour groups\! So, in effect, I only had*three*colours to work with per tile\. And if we count the colours in this single palm tree tile, there are… four\. And the colours don’t match the NES ones, either\!  I copied the tiles out from screenshots and videos of the Deltarune minigames by hand in Aseprite; at the time I began the project, the wider Deltarune community had not yet ripped the sprites out into spritesheets\. I think a few of my sprites are a little bit different because of this, but… oh well\! I started with the sand, the bricks of the big pyramid, the big door, some rocks, and the palm trees\. Using these as a sample, I loaded up the NES colour palette in Aseprite to see which 4\-colour palettes I could use for the tiles\. I eventually landed on a solution where I use dark brown as the universal background colour in the Desert area\. That at least gave me the colours I needed to draw the palm tree’s trunk, allowing me to draw the sand, darker sand, and leaves without trouble\. I used a really great application called`Nostalgic Assets Workshop`to convert my tiles from regular image files to the specific tile data format the NES would expect them to be inside CHR ROM\. It also let me double\-check my palettes and test laying out the tiles in the way the NES would\. 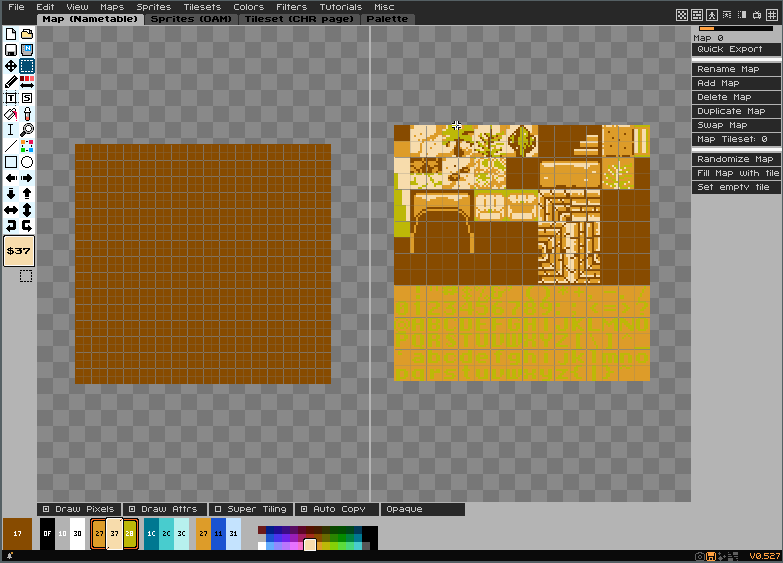 Of course, by setting the background to be a dark brown, the borders of the screen were also uniformly brown\. So, I ended up reserving one of the palette groups for the borders and HUD; black is actually a foreground colour in the HUD palette, and I draw solid black tiles where the border is\. Text uses white and black, and the status bars use a deep red for contrast\.
And just like that, I have enough colours to draw the tiles I picked out\! I used the other two entries for water tiles, and for the rock tiles\. By using these same colour palettes on a number of different tiles \(and by simplifying some of the more complex shapes, like the curves on the red sand tiles\) I had enough colours and tiles to draw any of the game’s Desert rooms\! Which leads me neatly into the next section…
## Level Data
So, remember I was talking about mapper chips, and bank switching? Well, each bank of PRG ROM that the MMC1 gives us is about 16kb in size\. It sounds like a lot of space, but let’s see… Starting with the desert tiles in CHR ROM; we have all these 8x8 tiles we can refer to by their index, and we can build a whole background by painting with these numbers\. The CHR ROM has 256 possible tiles, so we can handily store these indices in an 8\-bit byte each\. Because each room is 24 by 16 tiles in size, and we use one byte per tile, we would need to store 384 bytes per room\. The desert has roughly 34 rooms, give or take a couple of duplicates\. So, that comes out to… about 13kb of our 16kb banks just for the desert rooms alone\. That’s way too much for just one level, and we have several to do\! There must be a better way than having more than half the entire ROM be level data\. And of course, there is\. The first and most obvious thing to notice here is that the game’s backgrounds are exclusively in 16x16 tiles, or 12x8 for each room\. So, instead of individually referencing the 8x8 tiles, we can store information about the 16x16 groups instead, and use those as indices\. This immediately cuts our per\-room size down from 384 bytes to 96 bytes\. But of course, we can go further\! Notice how a lot of each level has the same data repeated over and over, like the large stretches of rock in this room here, or the “trees” room, which is just… trees? 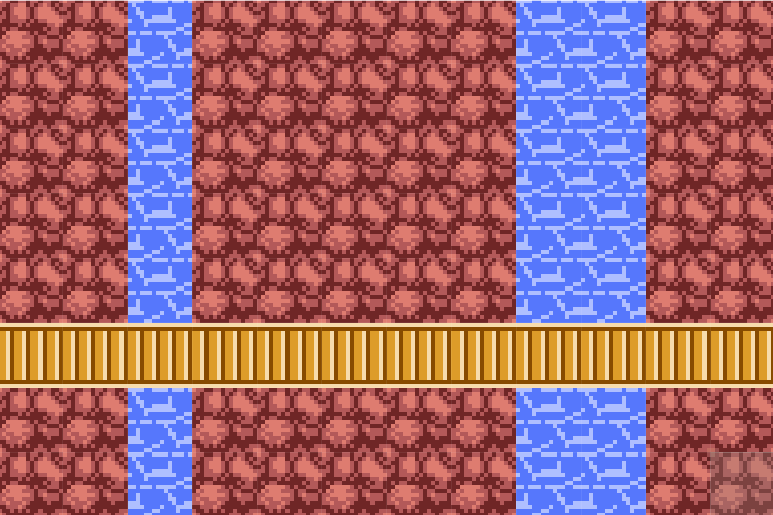 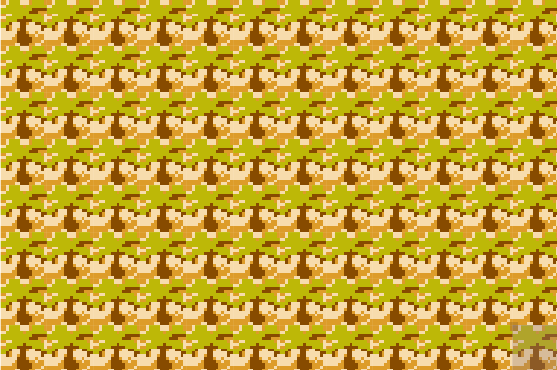 A super common technique used very widely in NES games \(and indeed in just about any software that deals with compressed data\) is called “run\-length encoding”\. Instead of listing each tile, you instead count “runs” of tiles\. So, when writing the data, you count how many tiles are the same as the current tile\. If the next tile is different, you write into the data what the tile’s index was, and how many repetitions there were, and then the current tile becomes that new different tile\. This means that you use two bytes for each time the tile index changes, but*only*when it changes\. So, for a room with a huge amount of repetition like the tree room, it goes from being this:
```
1 1 1 1 1 1 1 1 1 1 1 1
1 1 1 1 1 1 1 1 1 1 1 1
1 1 1 1 1 1 1 1 1 1 1 1
1 1 1 1 1 1 1 1 1 1 1 1
1 1 1 1 1 1 1 1 1 1 1 1
1 1 1 1 1 1 1 1 1 1 1 1
1 1 1 1 1 1 1 1 1 1 1 1
1 1 1 1 1 1 1 1 1 1 1 1
1 1 1 1 1 1 1 1 1 1 1 1
```
to this:
Each level now takes up a different amount of space in the ROM, and some even end up being very slightly larger than before, but the overall space saving is enormous\. This technique allowed me to fit all of the game’s data into a single ROM bank, leaving the others free for me to use for code and music\. Loading and uncompressing the data is just as simple, too \- read the current tile index, and the amount, then put that many of that tile on the screen\. Keep going until the data stops\!
So, that’s the main level layouts stored in the ROM\. But we can’t load it all into memory while the game is running\! The NES has just 2KB of RAM\. The first 255 bytes at the start of RAM are called the “zero page”; because the address of this area can be stored in an 8\-bit byte, rather than using two of them for a 16\-bit number, the NES can use special, smaller assembly instructions to access this RAM faster than the rest of RAM\. Because of this property, these bytes are precious; things that are used very often by the game, like the player’s current position, health value, and other bits and pieces are stored here first\. The level data must be unpacked and not in RLE form when used in the game, so to store a whole room here would take up 96 of those 255 bytes \- and so, the current unpacked room is stored in main RAM instead\.
There’s a bunch of other info besides just the tiles that need to be stored in levels, such as things like which rooms connect to which other rooms, where monsters and items should spawn, and so on\. I’ll cover that in a moment, but first, I want to talk about how I managed all this level data, since writing RLE level data by hand would be excruciating\. By using the pixel art tilesheets I made in Aseprite, I created a new project with`LDTK`, the free 2D level editing tool\. It’s quite similar to`TilEd`, for anyone who happens to be familiar with that, being a simple what\-you\-see\-is\-what\-you\-get editor\. I spent a while watching 100% playthroughs of the game to get the exact locations of everything mapped out \- but trimmed away a few things here and there where I could, to save on space overall\. LDTK’s file format is super easy to parse and read; it has the advantage of being able to lay rooms out next to each other in a grid, and automatically records information about which rooms neighbour other rooms on their edges \- which was extremely useful for this project\. 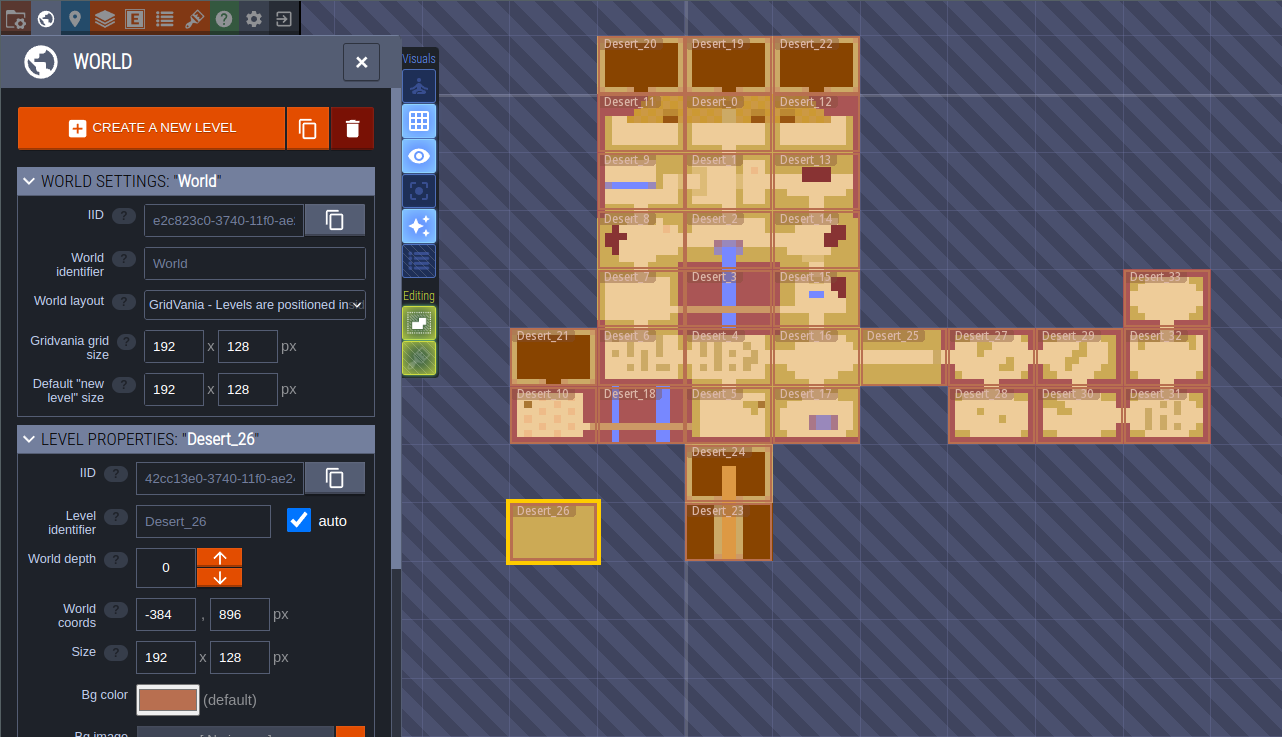 LDTK also supports placing arbitrary entities: monsters, items like the sword, rafts, and even “teleporters” for things like staircases were placed this way\. Using a tool like this made it super easy for me to make and edit the rooms and arrange them as I pleased, and I wrote my own python script for converting the data from LDTK’s format into C header and code files, so that I can build it directly into the ROM\. The RLE compression is done at this point\. In fact, the tooling was flexible I was able to hand over the building of the Island level to`leafcodes`, who also arranged and composed the music for the project\. She was able to build the rooms herself easily in a single day\! So, the actual level data format goes like this:
- Four bytes: each byte is the ID of the room that this room connects to, in the order: Down, Right, Up, Left\. This index is just the number that LDTK gives the room when it is created, so I can add, move, and delete rooms at any time in LDTK and these connections are automatically updated\.
- RLE tile data\.
- Then, for each entity on the level, 6 bytes:- First byte: What kind of thing is this? Monster, teleporter, item, etc\. - Second and third bytes: X, Y position of the object relative to the room\. - Fourth byte: Object subtype\. This controls what kind of monster or item should be spawned\. For teleporters, this is used for the destination room index\. - Fifth byte: Monster\-specific info\. For example, the walking\-type monsters in the Ice Palace are sometimes invincible, and this flag controls that\. For teleporters, this is the destination X coordinate\. - Sixth byte: Used by monsters to record their unique spawn ID; this is tracked by the game to know which monsters are currently dead, so that they do not reappear when moving back into a room you’ve already visited\. For the teleporters, this is the destination Y coordinate\.
- Finally, a byte with the value “128”\. This terminates a room’s data, and is needed to mark the end of the list of Entities\. Otherwise, it might start reading the next room’s data as if it were Entity data and load a bunch of weird monsters everywhere\!
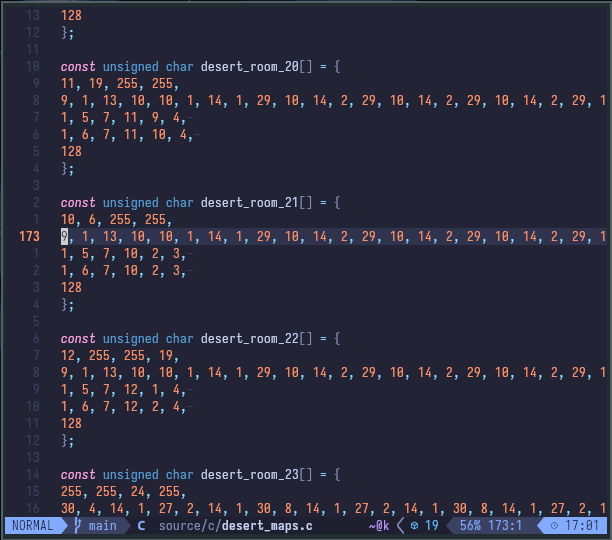 So, at long last, we now have a way of loading rooms, and having them connect to other rooms\. But wait… didn’t the original game scroll between rooms when the player reached the edge? And what happens if we scroll the screen on the NES when we reach the edge in this game\.\.? 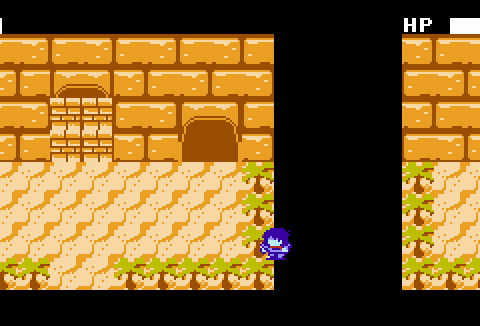 Oh\. Well…
The NES has no concept of layers for its backgrounds\. The HUD, border, and room are all on the same part of the screen, so they’ll scroll together\. While it*is*possible to split the screen into a scrolling part and a non\-scrolling part, like many NES games do, we can only easily do that for vertical sections, and not these horizontal parts\. So, I had to take out the scrolling\. I achieve the feeling of continuity by instead turning off the background layer completely and setting the background colour to black, moving the player’s sprite from one side of the screen to the other*as if*they were being scrolled, and then loading the next room and turning the tile display back on again\. It’s not perfect, but it gets the idea across just enough to work\!
So, finally, we have a world and we can move around it\! But hang on a minute… how did the player’s sprite get here?\! You’ll simply have to see how all that works in Part 2 of this series\!
## Next Time

Thank you reading this enormous post\! It’s been a lot of fun going back to this project a year later and digging around in it, and remembering all this stuff\. Next time, I’ll go over the Player and the Monsters, their sprites and behaviours, and things like the HUD, text, and cutscenes\. In Part 3, the final part of the series, I’ll talk about music and sound effects, the visual effects like the game’s intro, and the various narrative changes \(including the final boss\!\) that I was starting to think up as I made more and more changes and compromises due to the tech\!
Oh, and one last thing\. As of this post, the project’s source code will be made[publicly available to download on my GitHub](https://github.com/DrMelon/mantle), and will include things like the LDTK level files\! So if you feel like tinkering with it or digging through some \(admittedly kinda shaky in places\) C code, you can\!\!